You need to recommend a solution for the research documents that meets the museum's technical requirements.
B. On Server1, enable shadow copies. On all client computers, configure the Previous Versions client settings.
Possible answers are B and D, the consensus is B as it doesn't require the investment in other technology and one of your requirements is to minimize costs
Sharepoint versioning Versioning is the method by which successive iterations of a document are numbered and saved.
The default versioning control for a document library depends on the site collection template.
However, you can configure versioning control for a document library depending on your particular requirements. Each document library can have a different versioning control that best suits the kind of documents in the library. SharePoint
Foundation 2010 has three versioning options:
No versioning Specifies that no previous versions of documents are saved. When versioning is not being used, previous versions of documents are not retrievable, and document history is also not retained because comments that accompany
each iteration of a document are not saved. Use this option on document libraries that contain unimportant content or content that will never change.
Create major versions Specifies that numbered versions of documents are be retained by using a simple versioning scheme (such as 1, 2, 3). To control the effect on storage space, you can specify how many previous versions to keep,
counting back from the current version.
In major versioning, every time a new version of a document is saved, all users who have permissions to the document library will be able to view the content. Use this option when you do not want to differentiate between draft versions of
documents and published versions. For example, in a document library that is used by a workgroup in an organization, major versioning is a good choice if everyone on the team must be able to view all iterations of each document. Create
major and minor (draft) versions Specifies that numbered versions of documents are retained by using a major and minor versioning scheme (such as 1.0, 1.1, 1.2, 2.0, 2.1). Versions ending in .0 are major versions and versions ending with
non-zero extensions are minor versions.
Previous major and minor versions of documents are saved together with current versions. To control the effect on storage space, you can specify how many previous major versions to keep, counting back from the current version. You can
also specify how many major versions being kept should include their respective minor versions. For example, if you specify that minor versions should be kept for two major versions and the current major version is 4.0, then all minor
versions starting at 3.1 will be kept.
In major and minor versioning, any user who has read permissions can view major versions of documents. You can specify which users can also view minor versions. Typically, we recommend that you grant permissions to view and work with
minor versions to the users who can edit items, and restrict users who have read permissions to viewing only major versions.
Use major and minor versioning when you want to differentiate between published content that can be viewed by an audience and draft content that is not yet ready for publication. For example, on a human resources Web site that describes
organizational benefits, use major and minor versioning to restrict employees' access to benefits descriptions while the descriptions are being revised.
Configuring Volume Shadow Copy on Windows Server 2008
http://www.techotopia.com/index.php/Configuring_Volume_Shadow_Copy_on_Windows_Server_Once shadow copy has been configured for volumes on the server, the next step is to learn how to access the previous version of files from
client systems. This is achieved using a feature of Windows Server 2008 and Windows Vista called Previous Versions.
To access previous versions of a file on a client, navigate to the shared folder (or subfolder of a shared folder) or network drive using Start -> Network. Once the desired network drive or shared folder is visible, right click on it and select
Restore Previous Versions (or just Previous Versions on Windows Vista). Once selected, the Properties dialog box will appear with the Previous Versions tab pre-selected as illustrated in the following figure:
There are a number of issues that need to be considered when implementing shadow copy for shared folders. First and foremost the shared folders which are to be shadowed need to be identified. Secondly, a location for the shadow to be
stored must be allocated. This can reside either on the same volume as the shared folders, or on a completely different volume or disk drive.
Even before any data is shadowed, the shadow copy system requires 300MB of available space.
The total amount of space required will depend on the size of the shared folder which is to be
shadowed and the frequency and extent to which the files are likely to change (since shadow copy will only take new snapshots of files which have changed since the last snapshot). Finally, the time and frequency of the volume snapshots
needs to be defined. By default, Shadow Copy performs a snapshot twice a day at 7:00am and 12:00pm.
Once the Shadow Copy system has been configured the shadow copy client needs to be set up on the systems of any users that are likely to need to be able to restore files in shared folders.
Using Computer Management to Enable and Configure Volume Shadow Copies Shadow Copy is enabled on a per volume basis. Once configured on a volume, all shared folders residing on that volume will automatically be shadowed.
Shadow Copy can be configured either graphically using the Computer Management tool or via the command prompt. Command-line configuration of Shadow Copy will be covered in a later section of this chapter. This section will focus on
Computer Management configuration.
The first step is to launch the Computer Management configuration tool (Start -> All Programs ->Administrative Tools -> Computer Management). Once invoked, select Storage -> Disk Management from the tree in the left panel to display the disk and volume information for the local system. In the graphical view, right click on a volume and select on Properties to launch the properties dialog. In the properties dialog, select the Shadow Copy tab to display the Shadow Copy properties as illustrated in the following figure:
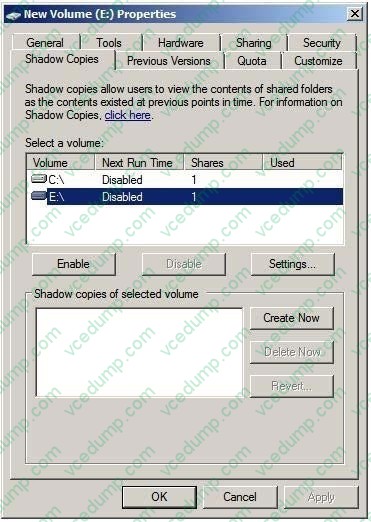
T
The Select a volume section of the properties dialog lists the volumes present on the local system.
Select the volume in this list for which Shadow Copy is to be enabled. With the volume selected click on the Settings button to display the following Shadow Copy Settings dialog box:
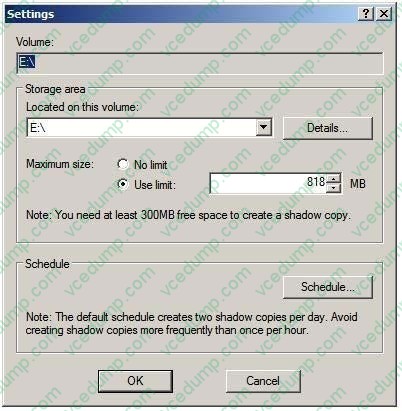
n the Located on this volume specify the volume on which the shadow copies are to be stored. This can be either the current volume or a different volume on the system. The Details button displays free and total disk space information for the currently specified volume. Once a suitable volume for the shadow copies has been selected the maximum size to be made available for the shadow copies may be defined. This can either be set to Maximum size which will use all available space on the specified volume, or capped to a specific size (keeping in mind that a minimum of 300MB is required for the shadow storage volume even before any snapshots are taken). Shadow Copy uses a differential approach to backing up files in that only files that have changed since the last snapshot are copied. For certain files, Shadow Copy also only copies the part of the file that has changed, rather than the entire file. As such, it is not necessary to reserve 64 times the size of the volume to be copied since only parts of the volume will be copied with each snapshot.
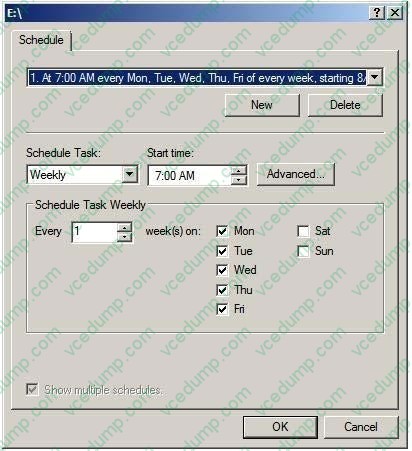
Schedule the shadow copy snapshots by clicking on the Schedule... button. By default, Windows configures two snapshots each day (at 7:00am and 12:00pm respectively). To remove a currently defined snapshot, select it from the drop down list and click on Delete. To modify a run, select it from the drop down list, modify the settings in the lower section of the dialog and click on OK.
To specify additional schedules, click on the New button and specify the days and time of the snapshot. Note that snapshots can also be configured to occur at user logon, system startup and even when the system is idle.
In fact, Windows Server 2008 provides considerable flexibility in terms of scheduling shadow copies. It is important to keep in mind, however, that there are disadvantages to running a shadow copy too frequently.
Firstly, shadow copies are resource intensive tasks, especially on large volumes where many files are subject to frequent changes. Repeated snapshots during periods when the server is heavily utilized may well degrade overall system performance. Secondly, it is important to keep in mind that Shadow Copy retains the last 64 versions of a file. Therefore, if a snapshot is run every hour, the oldest restore point available to a user will be approximately two and half days in the past. If, on the other hand, snapshots are taken twice a day, the user will have the luxury of restoring a file from a point as much as 32 days ago. It is important, therefore, to strike a balance between longevity and frequency.
The following screenshot illustrates the Shadow Copy scheduling dialog:
Once the schedules have been configured, click on OK to dismiss the scheduling dialog. Click OK once again in the Settings dialog to return to the Shadow Copy properties panel. At this point, the volume for which a schedule has been defined will have a small clock image superimposed over the volume icon and will indicate that 0 bytes of shadow copy storage have been used. The next step is to enable shadow copies on the volume by selecting the volume from the list and clicking on the Enable button. The volume in the list will update to display the date and time of the next scheduled copy and provide a summary of the current level of storage space used for the shadow copies.
To initiate a manual shadow copy now, or at any other time, simply select the volume to be copied from the list in the Shadow Copy properties panel and click on the Create Now button.
Restoring Shadow Copy Snapshots from Clients Once shadow copy has been configured for volumes on the server, the next step is to learn how to access the previous version of files from client systems. This is achieved using a feature of Windows Server 2008 and Windows Vista called Previous Versions.
To access previous versions of a file on a client, navigate to the shared folder (or subfolder of a shared folder) or network drive using Start -> Network. Once the desired network drive or shared folder is visible, right click on it and select Restore Previous Versions (or just Previous Versions on Windows Vista). Once selected, the Properties dialog box will appear with the Previous Versions tab pre-selected as illustrated in the following figure:
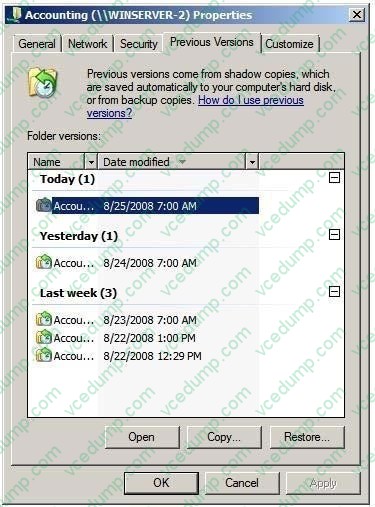
As shown in the previous figure, the Previous Versions property page lists the previous versions of the shared folder that are available for restoration. A number of options are available for each shadow copy snapshot listed in the properties dialog. Open will open the folder in Windows Explorer so that individual files and sub-folders can be viewed and copied. The Copy... button allows the snapshot of the folder and its contents to be copied to a different location. Finally, Restore... restores the folder and files to its state at the time of the currently selected shadow copy snapshot. As outlined in the warning dialog, this action cannot be undone once performed.
Topic 5, Woodgrove Bank Scenario: COMPANY OVERVIEW Overview Woodgrove Bank is an international financial organization. Physical Location The company has a main office and multiple branch offices. EXISTING ENVIRONMENT Active Directory Environment The network contains one Active Directory forest. A separate domain exists for each office. Network Infrastructure All offices have domain controllers that are configured as DNS servers. All client computers are configured to connect to the DNS servers in their respective office only. The main office has the following servers and client computers:
-One Windows Server Update Services (WSUS) server.
-
Client computers that run either Windows XP Service Pack 3 (SP3) or Windows 7.
-
Ten file servers that host multiple shared folders. The file servers run either Windows Server 2003 or Windows Server 2008 R2.
-
One domain-based Distributed File System (DFS) namespace that has two replicas. The DFS servers run Windows Server 2008 R2. The DFS namespace is configured to use Windows 2000 Server mode.
Each branch office has a WAN link to the main office. The WAN links are highly saturated. Each office has a dedicated high-speed Internet connection.
All of the client computers in the branch offices run Windows 7.
User Problems
Users report that it is difficult to find the shared folders on the network.
REQUIREMENTS
Planned Changes
Woodgrove Bank plans to implement the following changes:
-
Deploy a new Application named App1 on each client computer. App1 has a Windows Installer package and is compatible with Windows XP, Windows Vista, and Windows 7.
-
Designate a user in each office to manage the address information of the user accounts in that office.
-
Deploy a new branch office named Branch22 that has the following servers:
Technical Requirements
Woodgrove Bank must meet the following technical requirements:
-Minimize hardware and software costs, whenever possible.
-Encrypt all DNS replication traffic between the DNS servers.
-
Ensure that users in the branch offices can access the DFS targets if a WAN link fails.
-
Ensure that users can only view the list of DFS targets to which they are assigned permissions.
-
Minimize the amount of network traffic between the main office and the branch offices, whenever possible.
-
Minimize the amount of name resolution traffic from the branch offices to the DNS servers in the main office.
-
Ensure that the administrators in the main office manage all Windows update approvals and all computer groups.
-
Manage all of the share permissions and the folder permissions for the file servers from a single management console.
-
Ensure that if a file on a file server is deleted accidentally, users can revert to a previous version of the file without administrator intervention.
-
Ensure that administrators are notified by e-mail each time a user successfully copies a file that has an .avi extension to one of the file servers.
Security Requirements
Woodgrove Bank must meet the following security requirements:
-Access rights and user rights must be minimized.
-The Guest account mustoe disabled on all servers.
- Internet Information Services (IIS) must only be installed on authorized servers.