Andrew has created a document in InDesign CS5. He created some URL hyperlinks in his document, but when he exported his document into PDF, he found that the hyperlinks were not working.
What will Andrew do to correct the problem?
A. Double-click the hyperlink in the Hyperlinks panel> choose the URL from the Link To menu> deselect Shared Hyperlink Destination > click OK.
B. Choose New Hyperlink in the Hyperlinks panel menu > choose the URL from the Link To menu > specify appearance options > click OK.
C. Double-click the hyperlink in the Hyperlinks panel > choose the URL from the Link To menu > deselect the File > click OK.
D. Double-click the hyperlink in the Hyperlinks panel > choose the URL from the Link To menu > deselect URL > click OK.
Correct Answer: A
If a URL hyperlink is not working in an exported PDF, there may be a problem with the hyperlink being a Shared Destination. Double-click the hyperlink in the Hyperlinks panel, choose the URL from the Link To menu, deselect Shared Hyperlink Destination, and click OK as shown in the following diagram.
Question 82:
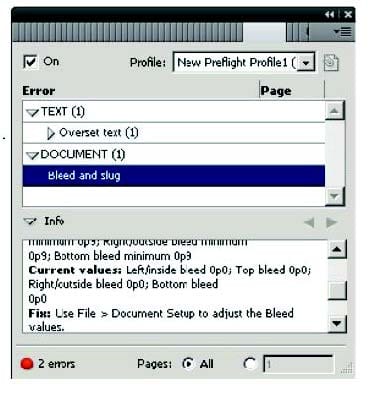
You work as a Design Expert for company Inc. You are creating a document. The document is showing the Bleed and slug error in the error pane of the Preflight panel. You want to know the solution to fix this problem. What will you do?
A. Double Click to expand the Document menu and then click on the red dot in the lower-right corner of the Preflight panel.
B. Double Click to expand the Document menu in the Preflight panel and then click the error in question.
C. Double Click to expand the Document menu in the Preflight panel and then click the Info pane.
D. Click on the icon on the left side from the profile pop menu in the Preflight panel.
Correct Answer: B
To view document errors, double click to expand the Document menu and to view information about specific errors such as in the above scenario the Bleed and slug error, click the error in question. appear in the Info pane at the bottom of the Preflight panel along with suggestions to fix the error as shown in the figure given below:
Answer: C is incorrect. Although the Info pane at the bottom of the Preflight panel contains the description of the error and the solution to fix that problem, if you double Click to expand the Document menu in the Preflight panel and then click the Info pane, it will not show the document error because this is not the right way to see the description of the error. Answer: A is incorrect. If you double Click to expand the Document menu and then click on the red dot in the lower-right corner of the Preflight panel, nothing will happen. Answer: D is incorrect. If you click on the icon in the Preflight panel, it will embed the selected profile.
Question 83:
You work as a Design Expert for KBC Inc. You have created an artwork that is restricted to two Pantone spot colors. When it got printed, you noticed that there are some objects using Cyan and Magenta colors in your document.
How can you detect these objects before printing?
A. Choose Window > Output > Flattener Preview panel.
B. Click on the info icon in the Preflight panel.
C. Select the Overprint Preview checkbox in the Separations Preview panel, then turn off visibility for the Pantone colors.
D. Choose Window > Swatches.
Correct Answer: C
The Separations Preview panel is used to preview color separations on monitor before printing to avoid unexpected spot colors and unwanted overprinting. The Separations Preview panel allows a user to easily turn colors on and off so that it can be seen how blending, transparency, and overprinting will appear in color separated output. The Separations Preview panel can be displayed by choosing Window > Out put > Separations Preview or pressing Shift+F6.
You can hide or view a separation ink on the screen by clicking the eye icon in the left of the separation name. To hide or view all separation inks on screen except one, press Alt and click the eye icon for that separation. To view all process plates at once, click the CMYK icon. The normal view can be returned by deselecting the Overprint Preview. Answer: D is incorrect. The Swatches panel stores colors. It is used to import, export, delete, and modify the color palette. Besides, a user can store custom colors in the Swatches panel. To add a color in the Swatches panel, move the cursor to the empty area of the Swatches panel (the cursor will change into the paint bucket) and click. To access the Swatches panel, select Window > Swatches. Answer: B is incorrect. The Preflight panel is a feature of InDesign CS5 that warns of the problems that could prevent a document or book from printing or outputting as expected while a document is being edited. These problems include missing files or fonts, low-resolution images, overset text, and a number of other conditions. The preflight settings can be configured to define which conditions are detected. These preflight settings are stored in preflight profiles for easy reuse. To open the Preflight panel, choose Window > Output > Preflight, and double-click the Preflight icon at the bottom of the document window. The Preflight icon is green if no errors are detected or red if errors are detected. The Preflight panel is shown in the image below.
Answer: A is incorrect. The Flattener Preview panel is used to see what page items (typically those with transparency) are flattened (made solid) during printing or exporting to Encapsulated PostScript (EPS), Scalable Vector Graphics (SVG, a vector format for the Web), or Portable Document Format (PDF) format. Flattening occurs for printing devices and graphics export formats that do not support transparency. To open the Flattener Preview panel, Choose Window > Output > Flattener.
Question 84:
Which of the following formats are NOT supported by InDesign? Each correct answer represents a complete solution. Choose all that apply.
A. AutoCAD Document Exchange Format (DXF)
B. Computer Graphics Metafile (CGM)
C. CorelDraw
D. DrawCorel
Correct Answer: ABC
The following formats are not supported by InDesign:
1.AutoCAD Document Exchange Format (DXF)
2.Computer Graphics Metafile (CGM)
3.CorelDraw
4.Eastman Kodak's Photo CD
5.Scalable Vector Graphics (SVG)
Question 85:
How will you reposition a page in the center of the document window?
A. Choose View > Fit Spread In Window
B. Choose View > Entire Pasteboard
C. Choose View > Actual Size
D. Choose View > Fit Page In Window
Correct Answer: D
You should choose View > Fit Page In Window, to reposition the page in the center of the document windows, if it is not already centered.
Answer: A is incorrect. The Fit Spread In Window option displays the targeted spread in the Window.
Answer: C is incorrect. The Actual Size option displays the document at 100%.
Answer: B is incorrect. The Entire Pasteboard option displays the full pasteboard.
Question 86:
By default, where can you find the Tools panel in a Adobe Indesign workspace?
A. Lower right corner of the work area
B. Upper right corner of the work area
C. Upper left corner of the work area
D. Middle of the work area
Correct Answer: C
The Tools panel is docked to the upper left corner of the work area by default. You can also undock the Tools panel. To undock the Tools panel, you can either drag the title bar or the gray dotted bar just below the title bar.
Question 87:
Which of the following statements are NOT true about the Place command? Each correct answer represents a complete solution. Choose all that apply.
A. It enables you to place a PDF file into an InDesign document.
B. It rasterizes artwork at the resolution of the InDesign document on which the artwork is placed.
C. It is used to place artwork on the active layer in the Layers panel.
D. It places artwork without rasterizing so that you can edit text or vector data in the placed artwork.
Correct Answer: CD
The Place command (File > Place) is used to place artwork into a new layer in an image as a Smart object. Initially, the artwork is placed with a bounding box that enables a user to move, rotate, or scale the artwork. The Place command enables the user to place PDF, Adobe Photoshop, and EPS files into the InDesign document. When the user places a file, it is rasterized at the resolution of the InDesign document into which it is placed. Since, the placed artwork is rasterized, the user cannot edit text or vector data in the placed artwork.
Answer: A and B are incorrect. These options are true about the Place command.
Question 88:
Which of the following tools can be used to create basic shapes?
A. Polygon tool
B. Rectangle frame tool
C. Ellipse frame tool
D. Polygon frame tool
Correct Answer: A
Following are the various objects that can be created with InDesign's object-creation tools.
1.Straight lines created by using the Line tool
2.Lines and shapes created by using the Pen tool or the Pencil tool
3.Basic shapes created by using Ellipse, Rectangle, and Polygon
4.Basic frames created by using Ellipse Frame, Rectangle Frame, and Polygon Frame
Question 89:
You have created a table in the InDesign. You see that your cursor position is at the top-left corner of the table. What does this mean?
A. It means you can click to select the column.
B. It means you can drag to resize the column containing the cell.
C. It means you can click to select the table.
D. It means you can click to select the row.
Correct Answer: C
If your cursor position is at the top-left corner of the table it means you can click to select the table. Cursor changes its shape when positioned on the cell, row, column, and table boundaries. The following table explains the different positions of a cursor and the actions that can be taken at those positions of the cursor. Cursor position Action that can be taken Above the top-left corner of the tableClick to select the table Above the left edge of a row Click to select the row Above the top of a column Click to select the column Above the right or left edge of a cell Drag to resize the column containing the cell Above the top or bottom of a cellDrag to resize the row containing the cell
Question 90:
For which of the following tasks is a page tool used? Each correct answer represents a complete solution. Choose all that apply.
A. To resize several objects that have commonly aligned edges simultaneously, while keeping the gaps between them fixed
B. To open a set of menu options to change the page size and orientation
C. To move the entire page's contents
D. To adjust the size of a gap between two or more objects
Correct Answer: BC
The shortcut for a page tool is Shift+P. The page tool is used for the following tasks:
1.To move the entire page's contents
2.To open a set of menu options to change the page size and orientation
Answer: D and A are incorrect. A gap tool is used to adjust the size of a gap between two or more bjects. It also allows a user to resize several objects that have commonly aligned edges simultaneously, while keeping the gaps between them fixed. It is a one-step way to adjust the layout by directly manipulating the space between objects.
Nowadays, the certification exams become more and more important and required by more and more enterprises when applying for a job. But how to prepare for the exam effectively? How to prepare for the exam in a short time with less efforts? How to get a ideal result and how to find the most reliable resources? Here on Vcedump.com, you will find all the answers. Vcedump.com provide not only Adobe exam questions, answers and explanations but also complete assistance on your exam preparation and certification application. If you are confused on your 9A0-142 exam preparations and Adobe certification application, do not hesitate to visit our Vcedump.com to find your solutions here.